Composing Great Photos
Lesson 2 – “Composing Great Photos”
One of the great things about photography is that anyone with any camera can take great pictures. Just having an expensive, fancy camera does not automatically mean that you are a great photographer.
Before you decide to buy a new camera because yours “doesn’t take good photos”, try some of the tips and exercises in this lesson, and see if you can notice a difference!
Point of View
One of the simplest changes that you can make to improve your photos is  changing your point of view. Most people tend to automatically hold the camera up to their eye level, and nearly always hold the camera horizontally, or landscape. It’s amazing what a difference something as simple as flipping the camera round and taking a vertical, or portrait shot can make!
Consider your subject. Although there are absolutely no hard and fast rules, as their names suggest, landscape photos lend themselves well to .. landscapes, and portrait photos to portraits!
The next thing to try when varying your point of view is to think about your height. Sometimes crouching down to take a photo from below and looking up can be very effective. And taking photos of children or pets when you are down on their level is also a good habit to get in to. Or perhaps it is a good idea to get yourself onto a bit of a higher level than your subject. This can be very effective when taking group photos, or when trying to minimize harsh shadows or double chins!
The beauty of digital cameras is that you can take a variety of shots of the same subject, but from different viewpoints, and see which one you prefer. Try it out – it’s not going to cost you anything!
Rule of Thirds and Leading Lines
This is one of those guidelines that most people have heard of when composing paintings or photographs. It is by no means a hard and fast rule – it is merely a guideline that often works. It can also be broken very effectively – but it’s a good idea to learn how to implement it first before experimenting with breaking it!
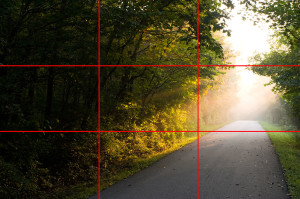
If you have a look at the photo at the top of this post, you will see that the picture is divide into a grid. The rule of thirds basically says that you should put the main element or subject of your photo on one of the lines or intersections rather than in the middle. It is generally accepted that it makes the picture more pleasing to the eye. I think this is usually a good idea when planning where to put your horizon – using one of the horizontal lines generally looks better.
Leading lines are also a useful technical element to a composition. Use what you see in front of you to lead the eye through the picture. This could be a road, a fence, or any other type of line. You could use this line to draw the viewer to the main element or focal point of what you want to show.
Horizons
A bit more on horizons. We have already said that not putting a horizon in the middle of the photo often looks better. But one of the biggest mistakes that people make that can really spoil a photo is not making sure that the horizon is straight! It can be really distracting and spoil an otherwise lovely photo if it looks lopsided! It just takes an extra second or two when composing the photo to double check your horizon.
Filling the Frame
 This is one of the tips that can make a big change to your photos. If you combine this with the other elements that we have discussed so far, you are well on the way to composing great photos.
When you have decided to take a photo of something, use the entire frame to the extent possible. If you are taking a portrait for example, you want the person to be the main focus. Get in closer, use your zoom, or move the person. This will also help you to eliminate other distracting things in the surroundings. If you are taking a close up of an object, place it according to the rule of thirds, but don’t be afraid to get in close and use the space that you have! Make it obvious what your photo is about.
Focus
Taking an extra few second to make sure that your shot is in focus will make or break your picture. No one wants to look at blurry, fuzzy and out of focus pictures, no matter how good they “could have been”.
If you are struggling (perhaps because of low light) to get your pictures in focus, try using a tripod – or improvise. Place you camera on a book, table, wall, or any steady surface and then take your photo. This is essential when using longer shutter speeds as we shall discuss in more detail in another lesson.
You can also use flash to “freeze” a scene – but use this with caution as I will also discuss later on!
No Distractions/Clutter
Another common flaw in a lot of snapshots is too many distractions or clutter in a photo. An important part of composing a photo is making sure that there are not objects in front or behind the main subject which will either look messy, or even silly (ie if you havent placed someone correctly, and there is a bush behind them it can look, in the photo, like they have a green fuzzy wig on!).
Take any distracting items away, and fill the frame with your subject to eliminate clutter. Move your subject, if possible to a cleaner/plainer looking background. Make sure that your finger isn’t in the way of the lens too!
Once you get familiar with using aperture to it’s best advantage, you will also learn that this is an effective way of “blurring” the background and making your subject stand out.
Using Frames

Sometimes it can be very effective to use something on hand as a frame for your photo. This can be an opening in a wall, a window, a bush – use your imagination!
This tip can be used in a similar way to how you use leading lines. You want the main focus of your picture to stand out, and you want the viewer’s eye to be drawn to that subject.
So these are a few tips that don’t cost anything which can improve your pictures. Taking a few extra seconds to check that everything is how you want it, and even planning your photo ahead of time can make a big difference.
Our next lesson will be “Making the move to “Manual” – learn about Aperture, Shutter Speed and ISO”